

Note: At this time, only members of CTS and the Finance and Business division may schedule a CTS shared space.
- Shared spaces technical support
- Types of spaces
- Rockwell Hall 10th floor map
- Equipment and technology by space
- Scheduling a shared space
- Using an SPO's equipment and technology
- Using the RHC16 SHMFR’s equipment and technology
- Accessing secured University resources in a shared space
- Troubleshooting and support
Shared spaces technical support
Conference room (SHMFR)
To report technical issues occurring during a meeting, please call the Office of Classroom Technologies at (412) 396-4614 for immediate assistance. After doing so, you may also walk down the hall to the Service Desk (Rockwell Hall 1001 suite) to see if an analyst is available to assist you.Hoteling space (SPO and SCW)
If you are using a hoteling space (SPO or SCW) and encounter technical issues or need
assistance with using technology in the space, please call the IT Service Desk at
(412) 396-4357 (HELP).
When calling the IT Service Desk, mention that you are calling about an issue with
an RH10 CTS shared space, and then provide the space’s Outlook calendar name (e.g., CTS-SCW-RH1002-C1).
Types of spaces
| Name | Category | Description |
|---|---|---|
| Schedulable private office (SPO) | Hoteling | An office equipped with a door and furniture that supports individual work, as well as in-person and hybrid meetings. |
| Schedulable cubicle workspace (SCW) | Hoteling | A cubicle that supports individual work, as well as in-person and hybrid meetings. |
| Schedulable hybrid meeting flex room (SHMFR) | Conference Room | A conference room that supports in-person and hybrid meetings and training sessions for small and large groups. These spaces may also be configured for short-term needs. |
Rockwell Hall 10th floor map
Click to view a map of the shared spaces.
Equipment and technology by space
RH 1002
| Space ID(s) | Microsoft Outlook Calendar Name(s) | Space Type | Equipment and Technology |
|---|---|---|---|
| RH 1002-C1 RH 1002-C2 RH 1002-C3 |
CTS-SCW-RH1002-C1 CTS-SCW-RH1002-C2 CTS-SCW-RH1002-C3 |
SCW |
|
| RH 1002-C4 RH 1002-C5 RH 1002-C6 |
CTS-SCW-RH1002-C4 CTS-SCW-RH1002-C5 CTS-SCW-RH1002-C6 |
SCW |
|
| RH 1002-C7 RH 1002-C8 RH 1002-C9 |
CTS-SCW-RH1002-C7 CTS-SCW-RH1002-C8 CTS-SCW-RH1002-C9 |
SCW |
|
| RH1002A | CTS-SHMFR-RH1002A | SHMFR |
|
RH 1003
| Space ID(s) | Microsoft Outlook Calendar Name(s) | Space Type | Equipment and Technology |
|---|---|---|---|
| RH 1003 C1 RH 1003 C2 RH 1003 C3 RH 1003 C4 |
CTS-SCW-RH1003-C1 CTS-SCW-RH1003-C2 CTS-SCW-RH1003-C3 CTS-SCW-RH1003-C4 |
SCW |
|
| RH 1003 C5 RH 1003 C6 |
CTS-SCW-RH1003-C5 CTS-SCW-RH1003-C6 |
SCW |
|
| RH 1003 C7 RH 1003 C8 RH 1003 C9 |
CTS-SCW-RH1003-C7 CTS-SCW-RH1003-C8 CTS-SCW-RH1003-C9 |
SCW |
|
RH 1004
| Space ID(s) | Microsoft Outlook Calendar Name(s) | Space Type | Equipment and Technology |
|---|---|---|---|
| RH 1004A | CTS-SPO-RH1004A | SPO |
|
| RH 1004B RH1004C |
CTS-SPO-1004B CTS-SPO-1004C |
SPO |
|
RH 1008–1010
| Space ID(s) | Microsoft Outlook Calendar Name(s) | Space Type | Equipment and Technology |
|---|---|---|---|
| RH 1008 | CTS-SPO-RH1008 | SPO |
|
| RH 1009 RH 1010 |
CTS-SPO-RH1009 CTS-SPO-RH1010 |
SPO |
|
RH Concourse
| Space ID(s) | Microsoft Outlook Calendar Name(s) | Space Type | Equipment and Technology |
|---|---|---|---|
| RH C4 RH C6 |
CTS-SPO-RHC4 CTS-SPO-RHC6 |
SPO |
|
| RH C8A | CTS-SHMFR-RHC8A | SHMFR |
|
| RH C16 | CTS-SHMFR-RHC16 | SHMFR |
|
Scheduling a shared space
Before you can use a shared space, you must first reserve it using Microsoft Outlook or Outlook Web App (OWA), as detailed in this section.
If you reserved a shared space and need to cancel your reservation, send a cancellation notice to the shared space’s calendar. Doing so will make the reserved timeslot available for scheduling.
Note: Dual-monitor configurations available in select shared spaces do not support macOS devices (i.e., only one monitor will work even though two are present). As such, we recommend reserving a shared space with a single monitor if you will be using a macOS device in a shared space.
Microsoft Outlook
- Select the calendar icon at the lower-left corner of Microsoft Outlook. The Calendar screen will be displayed.
- On the menu along the top of the Calendar screen, select Open Shared Calendar. The Open Calendar… window will be displayed.
- Enter the calendar name for the shared space you want to schedule, select the calendar from the list of results, and click Open. (See the table in the “Equipment and technology by space” section for each shared space’s Microsoft Outlook calendar name.)
- Review the shared space’s calendar and find a timeslot to reserve.
- On your personal calendar, click Appointment to create an appointment with the following information:
- Show As: If scheduling a hoteling space (SPO or SCW), select Free. If scheduling a conference room (SHMFR), select Busy.
- Title (Windows) or Subject (macOS): Enter a descriptive title for the appointment.
- Note: If scheduling a hoteling space (SPO or SCW), only your name will be displayed on the calendar appointment added to the shared space’s calendar. If scheduling a conference room (SHMFR), the appointment’s title will be displayed on the shared space’s calendar.
- Location: Select the calendar name corresponding to the shared space you want to schedule.
- Start Time and End Time: Enter the desired start and end time, respectively, for your reservation.
- Click Save & Close.
- Verify that your reservation is displayed on the shared space’s calendar.
Outlook Web App (OWA)
- Go to duq.edu/mail and sign in with your MultiPass username and password.
- Select the calendar icon on the side navigation bar. The Calendar screen will be displayed.
- Click Add calendar on the left side of the screen. The Add calendar window will be displayed.
-
- Select Add from directory on the Add calendar window and fill out the following fields:
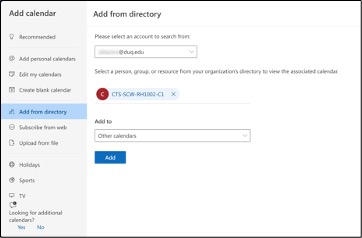
- Please select an account to search from: Select your @duq.edu email address.
- Select a person, group, or resource from your organization’s directory to view the associated calendar: Enter the name of the calendar for the shared space you want to schedule and select it from the list that is displayed. (See the table in the “Equipment and technology by space” section for each shared space’s Microsoft Outlook calendar name.)
- Add to: Select the section on the Calendar screen in which you want to display the shared space’s calendar.
- Click Add to open the selected shared calendar.
- Review the shared space’s calendar and find a timeslot to reserve.
- On your personal calendar, click New Event to create an appointment with the following
information:
- Busy: If scheduling a hoteling space (SPO or SCW), change Busy to Free. If scheduling a conference room (SHMFR), keep the selection of Busy.
- Add a title: Enter a descriptive title for the appointment.
- Note: If scheduling a hoteling space (SPO or SCW), only your name will be displayed on the calendar appointment added to the shared space’s calendar. If scheduling a conference room (SHMFR), the appointment’s title will be displayed on the shared space’s calendar.
- Start Time and End Time: Enter the desired start and end time, respectively, for your reservation.
- Search for a room or location: Select the shared space you want to schedule.
- Click Save.
- Verify that your reservation is displayed on the shared space’s calendar.

SPOs are equipped with a USB-C dock that allows you to charge your laptop, mirror
your laptop screen on or extend it to a TV display and use the Jabra PanaCast camera. Should employees also set the PanaCast device as the default audio device? The following subsections describe how to set the Jabra PanaCast camera as the default
video device for Microsoft Teams and Zoom meetings. Follow the steps below to connect to your department's copier on a university-managed
Windows 10 or macOS device. The audio device for the video system is set to ExtronScalerD (AMD High Definition Audio Device). You can adjust the audio level in the conference room from the source computer and
by using the audio rotary control setting on the podium control panel. Cables and adapters are located in the podium’s front drawer. When using the podium’s mouse and keyboard, make sure both devices are turned on and
set to 1 for the radio frequency (RF) mode.Using an SPO's equipment and technology
USB-C cable
HDMI cable
Note: If connecting to a TV display with an HDMI cable instead of the USB-C cable, you will
not be able to use the Jabra PanaCast camera.

For further instruction on using the Jabra PanaCast camera, see the Jabra PanaCast user manual.
Setting the Jabra PanaCast camera as the default camera for video meetings
Microsoft Teams
Zoom
Instructions on how to connect to and use the Kuando Busylight will be forthcoming.
If you encounter any issues when performing the steps below, contact the IT Service
Desk at x4357 or help@duq.edu to open a copier support ticket.Connecting to a copier on Windows 10
Connecting to a copier on macOS
Note: if you use copier accounting codes and print to a copier on a macOS device, you will
need to manually add the code to your device. Contact the IT Service Desk if you need help with this process.Using the RHC16 SHMFR's equipment and technology


Using the podium computer

Using a Barco ClickShare device


Using an HDMI cable

Video

Audio

Audio controls

Cables and adapters

Mouse and keyboard
Accessing secured University resources in a shared space
If you are using a hoteling space (SPO or SCW) and need to access secured University resources, such as network-based shared drives, servers and printers, you must first connect to the University’s virtual private network (VPN) using GlobalProtect. If GlobalProtect is not installed on your device, you may install it from Software Center (Windows) and Self Service (macOS).
For more information about downloading, installing and using GlobalProtect, please
visit duq.edu/globalprotect.
Troubleshooting and support
See the “Shared spaces technical support” section for instructions on requesting technical support for and reporting technical issues in a CTS shared space.